Showing posts with label fine motor. Show all posts

Tuesday, November 10, 2015

Paper Clip Color Sort

This is a fun, yet unique way of helping children learn 6 basic colors, as well as learning how to improve their eye-hand coordination.  In teacher terms, the paper clips serve as an educational manipulative that helps children identify colors, as well as place a small item onto the coordinating color.  This is a quick activity that you can throw together that will get kiddos' learning colors in no time!
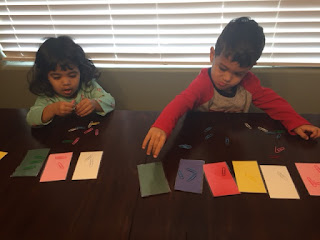


While children are sorting their colors, they will be learning more about:


  • Eye-hand coordination
  • How to manipulate smaller objects - fine motor skills
  • Counting and numbers
  • Colors
  • Language such as; in a row, line up, side by side, horizontal

Simple materials that you will need are:

  • Colored paper clips
  • Colored pieces of paper - mine are white, pink, red, yellow, blue, & green to coordinate with the colored paper clips.  If you want them to last longer, you can buy laminate sheets to coat the papers to make them stronger


First, I gave the kiddos the colored cards and told them to place them in a row, side by side.  I, as well, did this so they could have a role model.  There was a bit of a struggle with it, but they got it with a little assistance.  We also talked about the different colors.

After the colored row was made, I then handed them a handful of colored clips and they basically went to town.  They didn't even wait for me to give them instructions.  If I were to give them the instructions prior to, I'd ask them to place the colored clip on the matching paper.

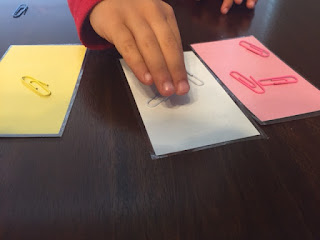


Not sure if you remember, but I have boy/girl twins.  It's hard NOT to compare them, but I still do at times.  My daughter is THE KNOW IT ALL.  She always has an answer to everything and she's normally correct.  My son struggles a bit, mixes his colors up, but he's not far behind her.  This activity was mostly dedicated for him to practice his colors.  He did a great job at matching, but still needs a bit of work at identifying!

Once they were finished sorting and matching, we did some counting of how many clips were on our colored paper.  I also tried to show them how to "clip" the paper clip onto the paper.  This activity is an extension of the sorting activity and my kiddos did struggle with this, but we'll keep on practicing!


Enjoy!

Monday, December 22, 2014

Snowball Toss

Its that time of the year and well...BRRRR it's cold outside.  In some areas, some of us have already seen some snow...maybe too much...while others aren't ever going to see any.  I put together a fun activity where my kiddos can play in the "snow", while practicing some of their other skills.

In the snowball toss, children will master:

  • Gross motor skills such as running and throwing
  • Fine motor skills such as grasping, pinching
  • Aim of throwing
  • Social skills such as turn taking, patience
  • Counting
  • Eye-hand coordination
  • Imagination and pretending
This activity is so simple and versatile and you can add whatever you want to make it simple, more complicated, or even more fun!  

Here's what you will need:
  • Socks, socks, and more socks.  The more socks the better.  I used socks that I had purchased at one time and didn't like.
  • Baskets for throwing into.
First, take the socks and roll them up as tight as you can so they make a ball.  Honestly, my kiddos had more fun trying to unroll them at one point.  Once they are in a ball, it's time to throw them and have some fun!  

I placed a white laundry basket out because my kiddos are still younger so target shooting isn't something they are great at yet.  The older the child, though, the smaller the basket to help with those skills of eye-hand coordination.


Action shot - my son throwing a snowball

Another action shot of my daughter running around trying to catch the snowballs


Once we threw all the snowballs into the basket, I attempted to count them.  My kiddos, though, were too excited and wouldn't allow me.  They were picking them out before I could count them!


This was such a fun activity, that we do this almost daily.  Some days, we pretend to throw them at each other.  While some might frown upon that, my kids obviously don't have that much strength to throw something that hard, plus it helps to build their gross motor skills.

Any other variations that you do?  Please share!  

Monday, September 9, 2013

Homemade Puzzles


Today I am going to show you a fun yet quick activity that you can make with food boxes that might be just sitting around in your food pantry or cupboard.  It seems that puzzles can be costly sometimes and children out grow them making them an expensive investment.  Little do some know though, you can make your own at home that are very affordable and you can change them out without worrying about costs!


After making your own puzzles, your child can learn all kinds of things:

  • Fine motor
  • Cognitive skills - Letters, Shapes, Numbers, Colors
  • Problem solving skills
  • Eye-hand coordination

The only two things you will need are:
  • Empty food boxes
  • Scissors

Basically the steps are so simple.  First, you need to take the empty food boxes and cut the front panel out from the rest of the box.

The front of the boxes

The next step and the last one :) is to cut the boxes into the shapes and pieces you want.  You can go completely simple and cut them into 2-3 pieces or more complex with additional pieces.

These are cut into random shapes; 1st box into 3 pcs. & 2nd box into 4 pcs.

In my past experience with homemade puzzles, I have learned the more letters/numbers on the package the harder and it can be to put the puzzles back together.  Therefore, keep this in mind when you are cutting the boxes into your desired pieces.  I also use random cuts when cutting them, but you can always have a plan and cut out precise shapes or edges.  

*I used the boxes that I HAD in my pantry.  I don't have grown kiddos yet so I don't have any kid friendly boxes.  Choose boxes that your child enjoys looking at or recognizes to make the activity more exciting!

Enjoy and feel free to share any ideas that you have!

Wednesday, July 10, 2013

Cardboard Slot Builders

This activity is basically something that doesn't take a lot of materials, but it can take a few extra minutes to prepare.  There is so much you can do with cardboard, especially your empty food boxes.  So today, I am sharing with you a simple building activity that your child can do.


To create this activity, you will need: 
  • Empty food boxes 
  • Scissors
  • Tape (optional)

See!  So Simple!


Your child will learn:
  • Eye-hand coordination
  • Fine motor skills
  • Patience
  • How to use their imagination
Here's how it works.  First take the cardboard or food boxes and cut them apart.  I used the front and back of the boxes.  Once you have the fronts and backs removed, cut them into small squares~smaller boxes cut 4 squares and larger boxes 6 squares.


Next, you need to cut small slots on each of the sides.  The ones I pictured seem like small slots, but actually I could have gone even smaller.  Just test it out depending on the thickness of your box. :-)


Once the slots are cut, your child is ready to build by placing each slot together.


Now add all the pieces together, and waa-lah, you have your very own slot builders!


~~~You can tape the edges if you like for extra safety!  This will help prevent any sharp edges!~~~

These can be fragile and difficult to work with at times, so this activity is mostly for older children who have developed some patience already.  Also, try out different types of materials and see which ones work best for you!  Different materials also will help build finer motor skills!

Good luck!

Thursday, June 27, 2013

Paper Plate Lacing

In my basement, I have basically had a bunch of curling ribbon just sitting around.  Actually it was kind of a mess and I wasn't sure it was even worth using on gifts anymore.  Well with that thought, I was for sure thinking I might just have to toss it out, but I actually came up with a really simple activity that you can do with the ribbon and a basic paper plate.

While completing this activity, your child will learn:

  • Fine motor skills
  • Patience
  • Tactile stimulation
  • How to follow directions and/or a pattern
  • Eye-hand coordination 
Now as I mentioned before, this activity is very simple and you don't need a lot of materials.  You will need:

  • Paper plate
  • Ribbon - I used curling ribbon, but you can also use fabric ribbon 
  • Paper puncher
  • Tape
First, take the paper plate and punch holes in it along the edge.  You can do as many or as little as you want.  Preferably punch less holes wider apart for younger children and more holes closer together for older children.  In the picture below, I punched the holes closer together.


Next, take a piece of ribbon and cut it according to the length needed to completely go around the whole plate.  On the edge of the ribbon, place a piece of tape around the end to make it lace easier through each of the holes.  Trust me, this will make it much easier!


Once the tape is secure, your ribbon is ready to lace through the holes.  This activity is so versatile and yet very easy.  Again, it can take some patience but don't worry, your kiddo will get the hang of it sooner or later!  

Happy lacing!

Wednesday, May 23, 2012

Rubber band Pull and Stretch


Have you ever purchased one of those big balls of rubber bands and thought to yourself, "What am I going to do with all of these?"  As a matter of fact, there is more than one purpose for rubber bands other than for office use.  Through the activity, children are able to use those extra rubber bands and also other objects that you find around the house that can help build their fine motor skills.


During this activity, children will develop:

  • Fine motor skills - for those future writers!!
  • Eye-hand coordination
  • Math skills that help children recognize colors and sizes.
  • Patience!

What will you need to make this fun activity:
  • First and foremost, you must collect a variety of rubber bands to make this activity work.  As I mentioned before, I had one of those giant balls of colorful rubber bands sitting around my house that I rarely used.  All you need is a few rubber bands from the ball, I prefer some that are similar in size with maybe a few that vary in size.
 
    • Plastic lids of different sizes 
     

    Basically, there are no steps in making this activity.  You are able to engage in this activity with your child the moment you are able to gather the materials.  Just give your child the pile of rubber bands with the lids and encourage him or her to start stretching the rubber bands over the lids.  To make it easier, you can cut slits in the sides of the lids to help the rubber bands fit more securely, but WARNING - that may leave sharp edges!  In addition, discuss with your child the different colors of rubber bands as well as the different sizes.  Building their math vocabulary through this activity is an extra bonus!

    Extension Idea:

    Rubber bands can basically fit around anything, plus if you want to make the activity easier for younger children, you might want to find different objects.  Other great items to collect include plastic juice jugs, yogurt containers, cups, etc.  Again, these items are also very easy to collect, plus it puts your recyclables to great use!

    Any other ideas?  Please share!