Sunday, August 12, 2012

"Lots of Lids" Size & Sort

Have you ever wondered what you could possibly do with all those left over containers.  Of course you can recycle them which is always a great thing, but before recycling, you can give them to your little one for a great educational experience.  This activity is so simple that it takes little effort to put together.

For this activity, the only items you will need are a variety of plastic containers with their corresponding lids.  So easy!


While playing with the lids and containers, children will develop:

  • Fine motor skills through manipulating the containers and lids
  • Eye-hand coordination
  • Size differentiation - small, medium, large
  • Sorting
  • Shapes - cylinders, cubes, ovals, circles (this all depends on what kind of containers you have)
To play, all you need to do is lay out the lids and containers side by side and let your youngster explore and investigate the different sizes of containers.  If your child is a little younger, feel free to give them a little push and show them that the lids go on top of the containers.  I bet they'll enjoy doing this activity and it might keep them busy for a some time so you might be able to get some stuff done as well!  :-)

Have fun!

Thursday, July 12, 2012

"Pick a Card" Math Game

Last year, my husband started playing poker and really enjoyed it.  For his birthday party, I planned a poker theme and bought several decks of cards.  During the party, they were highly used and after that, not so much.  I left them in a box in the basement thinking I would probably never use them again, but to my surprise I have thought of a great use for those extra cards!  I am going to teach you a simple math game that you can create using one deck (or more) of cards and a few extra items you find around the house.


While playing this game, your child will learn:
  • Number recognition
  • Sorting and classifying skills
  • Counting
  • Shape and color reinforcement
  • Social skills, such as turn taking, if he/she is playing with another friend


The materials you will need include:

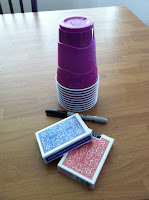
  • Plastic cups - doesn't matter which color they are
  • Black permanent marker
  • A deck (or more) of playing cards

First, count out at least nine cups.  Unfortunately, with a deck of cards you will not be able to teach ALL the numbers from 1-10, but you will be able to teach most of them.  *If you want to, you can take a A, K, Q, J card and tape a piece of paper over it and write the number one on it to make your own "one" card for the game*  

Next, take your cups and the permanent marker and place the numbers 2-10 on the cups.


Once there is a number on each cup, place them in any order that you feel is developmentally appropriate for your child.  Then give your child the deck of cards. *If this is the first time you are completing the activity, start with half the deck and you can work up to the whole deck*  Encourage your child to sort through the cards and you can also help as needed.


After the cards are displayed for the child, encourage him or her to name the number on the card, and then place into the appropriate numbered cup.


This activity is a great math activity and yet so simple to make!  If you don't have plastic cups available, you can use plastic/styrofoam plates or bowls as well!

Have fun!

Extension Idea:

So what to do with those A, K, Q, J cards?  Go ahead and make cups for those as well!  You can either combine the two activities together or separate them.


Thursday, June 21, 2012

Baggie Books

Sometimes you find some things around the house that you would never think of using to help educate your child.  But sometimes it is as simple as opening the bottom drawer in the kitchen and using household office items.  With this in mind, I have found a new use for a few of those common household items.  I present to you the "Baggie Book".


When your child is using the baggie book, it is basically like any other book, but YOU get to be the author.  During this activity, your child will learn:

  • Basic reading skills such as print awareness and the understanding of how a book reads from left to write.
  • How to take care of a book.
  • Other concepts such as shapes, colors, letters, numbers, etc. based on whatever YOU decide to place inside your baggie book.

The items that you will need to make your own baggie book include:

  • Plastic baggies with seals; I chose sandwich size which probably work the best.
  • Stapler
  • Duct tape or blue painters' tape; I found that duct tape worked better for a tighter seal.
  • Content that YOU would like your child to learn, such as $1 bin flashcards, pictures from magazines, even old empty food boxes.

To make:

First, take approximately 3-4 baggies and place one on top of each other.  Take the stapler and staple the opposite ends from the seal with the stapler; preferably in 3 different spots. You can staple in more spots of you want EXTRA stability!  :-)

Once the staples are applied, measure out enough duct tape and place over the staples on each side of the baggie.  This helps keep the staples out of sight for safety and also reinforce the book and make it last a little longer.
Once the seal is on, the book is ready for YOU to place whatever your heart desires.  I had old flashcards sitting around so I placed them inside.
Open book with double sided pages
Finished book!
                    
Waa-laa!  You now have yourself a homemade activity book!  I know it doesn't seem like much, and it can probably fall apart if taken care of properly, but for the time being it is a great activity that you can change out at anytime depending on your child's needs.  Baggies can be so diverse and used for other activities as well.  Do you have any other ideas for baggies?

Wednesday, May 23, 2012

Rubber band Pull and Stretch


Have you ever purchased one of those big balls of rubber bands and thought to yourself, "What am I going to do with all of these?"  As a matter of fact, there is more than one purpose for rubber bands other than for office use.  Through the activity, children are able to use those extra rubber bands and also other objects that you find around the house that can help build their fine motor skills.


During this activity, children will develop:

  • Fine motor skills - for those future writers!!
  • Eye-hand coordination
  • Math skills that help children recognize colors and sizes.
  • Patience!

What will you need to make this fun activity:
  • First and foremost, you must collect a variety of rubber bands to make this activity work.  As I mentioned before, I had one of those giant balls of colorful rubber bands sitting around my house that I rarely used.  All you need is a few rubber bands from the ball, I prefer some that are similar in size with maybe a few that vary in size.
 
    • Plastic lids of different sizes 
     

    Basically, there are no steps in making this activity.  You are able to engage in this activity with your child the moment you are able to gather the materials.  Just give your child the pile of rubber bands with the lids and encourage him or her to start stretching the rubber bands over the lids.  To make it easier, you can cut slits in the sides of the lids to help the rubber bands fit more securely, but WARNING - that may leave sharp edges!  In addition, discuss with your child the different colors of rubber bands as well as the different sizes.  Building their math vocabulary through this activity is an extra bonus!

    Extension Idea:

    Rubber bands can basically fit around anything, plus if you want to make the activity easier for younger children, you might want to find different objects.  Other great items to collect include plastic juice jugs, yogurt containers, cups, etc.  Again, these items are also very easy to collect, plus it puts your recyclables to great use!

    Any other ideas?  Please share!