Monday, December 7, 2015

Ornament Sort and Match

Can we say Christmas!!  Ah yes.  It's such a fun time of the year and the children are most likely so excited, but going stir crazy in the house due to colder weather.  Fortunately, we've been blessed with decent weather and my kiddos have gotten outside for at least a few minutes a day, but somehow they are still getting into everything with all the decorations sitting around.  This year, I purchased an extra set of ornaments for them to play with thinking they'd leave mine alone.  While they were excited to see and play with them, they still mess with my ornaments, but not nearly as much as they probably would.


All you really need is shatterproof ornaments of different colors.  I chose three colors, but you can choose as many as you wish.  Mine are also shiny and matte which was a plus!

First, we started with the box of ornaments and we talked about the color, the shape, and the textures.  After that, I let them go to work.  They started placing them in piles according to their colors.


Once there were multiple ornaments in each pile, they started placing them into rows.


I took the opportunity to discuss what "rows" are and we then proceeded to count how many were in each row.


Finally, we sorted them according to their textures.  They really enjoyed looking at their reflections in the shiny ornaments.  They prefer the shiny ornaments to the matte. :-)

This is a quick and simple activity for your kiddos that can keep them busy and hopefully distracted from the Christmas bustle!


Tuesday, November 10, 2015

Paper Clip Color Sort

This is a fun, yet unique way of helping children learn 6 basic colors, as well as learning how to improve their eye-hand coordination.  In teacher terms, the paper clips serve as an educational manipulative that helps children identify colors, as well as place a small item onto the coordinating color.  This is a quick activity that you can throw together that will get kiddos' learning colors in no time!


While children are sorting their colors, they will be learning more about:


  • Eye-hand coordination
  • How to manipulate smaller objects - fine motor skills
  • Counting and numbers
  • Colors
  • Language such as; in a row, line up, side by side, horizontal

Simple materials that you will need are:

  • Colored paper clips
  • Colored pieces of paper - mine are white, pink, red, yellow, blue, & green to coordinate with the colored paper clips.  If you want them to last longer, you can buy laminate sheets to coat the papers to make them stronger


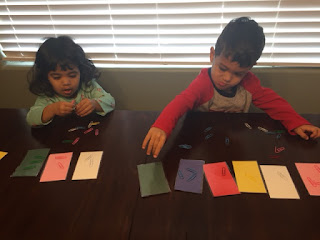
First, I gave the kiddos the colored cards and told them to place them in a row, side by side.  I, as well, did this so they could have a role model.  There was a bit of a struggle with it, but they got it with a little assistance.  We also talked about the different colors.

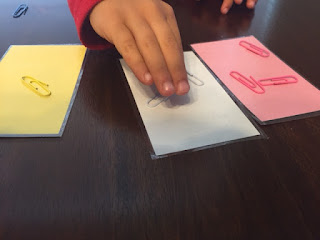
After the colored row was made, I then handed them a handful of colored clips and they basically went to town.  They didn't even wait for me to give them instructions.  If I were to give them the instructions prior to, I'd ask them to place the colored clip on the matching paper.


Not sure if you remember, but I have boy/girl twins.  It's hard NOT to compare them, but I still do at times.  My daughter is THE KNOW IT ALL.  She always has an answer to everything and she's normally correct.  My son struggles a bit, mixes his colors up, but he's not far behind her.  This activity was mostly dedicated for him to practice his colors.  He did a great job at matching, but still needs a bit of work at identifying!

Once they were finished sorting and matching, we did some counting of how many clips were on our colored paper.  I also tried to show them how to "clip" the paper clip onto the paper.  This activity is an extension of the sorting activity and my kiddos did struggle with this, but we'll keep on practicing!


Enjoy!

Wednesday, February 18, 2015

Snowday = FUNDAY!!!!

A couple of weeks ago, we had a big snowstorm that left us inside for the whole day and honestly for most of the week.  The drifts were at least up to my husband's knees and I was a procrastinating mama who never got around to getting my kiddos snow boots or snow pants so there was NO chance we were going outside.  With that being decided, I chose to bring the snow INDOORS.  YES INDOORS!!!!!!  EEK!  It's actually pretty fun.  You should try it!


Honestly, this is just so simple and you can put your own twist on it. Here's what I used:
  • Snow
  • Big bowls - can use pots, pans, plastic storage tubs
  • Spoons, bowl, cups
  • Towels - keep handy for wiping up snow globs on the floor and for wiping little cold fingers
Basically when my kiddos were playing with this cold stuff, they were taking away a lot of opportunities to learn some awesome stuff:
  • Language - cold, wet, big, little, scooping, hard, soft, colors, spoons, dumping, melting, clumping
  • Cause & effect - the snow is white and flaky, but melts after sometime; if i put the snow in here (bowl) & dump it out it keeps it shape; I can use this spoon to fill my bowl; if I clump the snow together, it becomes hard
  • Size comparison & volume - scooping the snow, putting it into bowls
  • Size seriation - when we attempted to make tiny snowmen, there were three different sizes of snowballs
  • Sensory experience


This activity doesn't need a lot of explanation or instructions.  Primarily, you give them snow and let them explore to their hearts desire.  My son LOVED it, but my daughter didn't enjoy having wet/cold hands but she still continuously played in it.  She did, though, ask me every two minutes to wipe her hand.  :-)
Look at that face!  This is the reason towels come in handy!!

To give some other components to the snow play, you can add:
  • Colored water/colored markers
  • Cookie cutters
  • Warm water to watch the snow melt
  • Different sizes of spoons and bowls
Let me know what your favorite thing to do in the snow is?


Tuesday, January 20, 2015

Cup Stack and Sort

Cups are a very easy activity for children to play with.  They are very versatile and can be used for many different activities.  In this post, I'm going to show you what my kiddos and I did with these cups that I found at the dollar store.


What you will need is very simple: CUPS.  I found these multicolored hard plastic "tumblers" at my local dollar store probably two years back.  If you can't find these specific cups, multicolored thinner plastic cups that you find in the napkin aisle at a local grocery store will work as well.

In this activity, we learned:
  • Precision and how to place the cups inside one another and side by side
  • Colors
  • Sorting
  • Stacking
  • Counting
  • How to use eye-hand coordination
  • Cause & effect
  • New language - we talked about how high we could build the towers, how to put cups in a line
Here are some of the things that we did with the cups:


First, we placed cups one inside the other.  We talked about how the cups fit together and made a big tower.  This also took some strength as the cups became stuck at times, but my kiddos' persistence won that battle.


Next, we stacked them and made even bigger towers.  Here we counted how many were on the bottom, second row, top, etc.  We then had fun knocking them down!


Then, we placed them in "piles" according to their colors.  Actually, my son did this on his own and I helped him by reinforcing what he had done and kept encouraging him to make those piles by placing the cups according to their color.  


Finally, we practiced putting cups into a line.  Although they weren't placed by colors, we still learned about coordination and also the beginning and the end of the line.


We had a lot of fun with this activity.  My kiddos sat for almost 20 minutes with the cups.  I can only say that doesn't happen that often with toddlers!  

Tuesday, January 6, 2015

Pincher Pickup

The pincer grasp is a fine motor skill that children learn during their first year.  Normally it is used to pick up something small, but eventually kiddos need to graduate into a more defined pincer grasp that requires more concentration and muscle coordination.  This activity will do such so!

This activity requires only 2 things ~ clothespins and cotton balls/pom poms.  

You can go to the dollar store to get both or even Wal-mart.  I also picked up some tweezers that you could also use if you decide not to use the clothespins.


Other than the development of the pincer grasp, children will also learn:

  • Eye/hand coordination
  • Cause & effect
  • Patience
  • Fine motor skills
  • If using colored poms, learn colors
  • Counting and numbers

First, you need to allow your kiddo how to use the clothespin and explore how it works.  Do not skip this step if your child has never used one before.  I gave this to my kiddos and they had no clue how it worked.  They tried to pinch it several times and they also took it apart many times as well.  I also pointed out that the pinch could be an "Ouchy".  This helps them to understand that they shouldn't try to pinch each other or their own fingers if at all possible.


Once they've explored how to use it, you can then introduce them to the pom poms and how to pick them up.


As mentioned before, my kiddos didn't have any clue how to use these.  I showed them several times how to pinch and grasp the poms, and they only cared about the poms and playing with them.  They kept picking and gathering them and then placing them elsewhere in the room.  We will obviously be revisiting this activity in the future because we definitely need more practice.

But since they couldn't quite grasp how to pinch the top of the clothespin, my son decided to try to pick up the poms with his own technique!  :-)

My son using the opposite end of the clothespin to pick up the poms.